HOW TO
EFFECTIVELY USE THE GRAY CARD
by Mark Woods
Recently
I was asked to participate in a presentation of Eastman's Telecine Tool Kit
to the International Photographers Guild's western region members. This kit
provides a number of tools for directors of photography. There are two 35mm
Kodak Telecine Exposure Calibration (TEC) Films, two 16mm TEC films, Kodak's
Cinematographers EV Software, Kodak's Cinematographer's EV Scale, a complete
set of user's guides, and the heart of the system-Kodak's Gray Card Plus. Although
I could go into great detail about the rest of the system, none of it will work
the way it's designed unless the cinematographer exposes the gray card in the
manner s/he intends. This is more easily said than done in the field, and it
was in this area I was asked to help.
What
is a gray card and why is it important?
The gray
card is the single most important tool in understanding exposure and density.
All correctly calibrated light meters measure light in reference to 18% gray.
Whether the meter is a spot meter or an incident meter, makes no difference.
The T/Stop indicates the necessary exposure to achieve 18% gray on the negative.
What
makes the gray card plus different?
The Gray
Card Plus has a large center field of calibrated 18% gray. On each side are
equal patches of 3% reflectance black and 90% reflectance white. In the system
Kodak is developing, this card provides the electronic colorist with three
reference points to set the electronic black and white levels for the film,
and the gray provides the field to determine the transfer points. Although
the electronic points aren't supposed to exactly match printer points at a
lab, they do come close. They won't match the actual lights, but any variation
you have with the printer lights will be proportionate to the transfer lights.
Kodak set the transfer light system up on a compromise 7 point scale. The
compromise is because some labs use a 6 point/stop system (e.g., Foto-Kem)
while others use an 8 point/stop system (e.g., Technicolor). A final and very
important note about the card, the surface of the card is coated with a special
matte finish. This finish allows the cinematographer to light the card in
less than ideal ways. It minimizes the glare caused by a light's reflection.
On a test, I lighted it from one side, knowing that one side would be brighter
than the other, but I figured this really is what happens in the field. The
amount the one side was brighter, the other side was darker. The average was
in the center, and it reflected the T/Stop I was filming. When I went in for
the telecine, the colorist set the value for the center of the card-the average-and
the film came up very close to what I had in mind. It's a very good card,
and it is 18% gray.
Why
doesn't my incident meter match my spot meter?
The incident
meter averages the light falling on the ball to indicate a T/Stop, while a
spot meter reads light directly reflected off a subject indicating the exposure
to achieve 18% gray. That's why the spot meter reads white around 2 or more
stops over the T/Stop on the lens, and black as 4 to 6 stops below the T/Stop
on the lens. Once you understand this, it should be easy to use both meters
effectively.
Take a moment to look at the Spot Meter/Incident Meter Relationship handout
I gave the participants at the Kodak presentation. It graphically indicates
the altitude to hold the meters. (Note: This is a simplified drawing. The
incident meter should have a disk, and the camera lens should be on the same
axis as the spot meter/incident meter ball.) The incident meter may give the
same reading as the spot meter, but it only reads the light falling on the
ball-not necessarily the gray card, it certainly doesn't read the light reflected
off the gray card. There is the possibility that the gray card may not be
18% gray-I know of cards out there that aren't 18% gray. Using a card that
is off is a problem with the incident meter, but not with the spot meter since
it reads reflected light. Using a spot meter is the only way to insure the
gray card exposure is correct, since it measures the actual light reflected
off the card. In fact, the card could be white, and the meter would give the
correct exposure to film it at 18% gray. As you can see, this isn't true when
using an incident meter.
What
is the L.A.D., and what's that got to do with an 18% gray card?
If you've
been following my articles, you see me return time and again to the L.A.D.
Test that I discovered a number of years ago. L.A.D. are the initials for
Lab Aim Density. This is the optimum density for the best quality of color
reproduction and granularity. The L.A.D. represents the film's density of
18% gray (you can refer to the original article, "L.A.D. Testing Procedures,"
International Photographer Magazine, May 1996). Take a look at the L.A.D.
Schematic, and follow the steps. I think you'll see how the exposure indicated
by the spot meter translates to the physical density on the film, and the
resulting printer lights (also telecine transfer lights). This diagram gives
an overview of my L.A.D. System of testing negative film stock. As with the
Telecine Tool Kit system, my L.A.D. Test's usefulness is directly dependent
on skill with which it's performed. Since I know most of the negative L.A.D.
EIs from tests I've performed, I felt they should fall in line with the transfer
points in Kodak's system. In the Telecine Tool Kit test I participated, I
predicted my transfer points. I'm happy to say the transfer points were only
one point off on the red and green, and matched the blue. It validated my
L.A.D. Test and the Kodak's system performance.
What
difference does color temperature make?
In purely
technical terms, the factors affecting the acuity of the film are: 1.) the
tolerances of the camera; 2.) the quality of the lenses; 3.) the diffusion
on the lens; and 4.) the color temperature of the light in relationship to
the color sensitivity of the film.
Film is designed to be exposed with a balanced color temperature, typically
3200° K. The balanced light exposes each emulsion layer with the amount of
light it needs to work in optimum harmony with the other layers. If that's
changed, something has to change in the negative. This doesn't mean a director
of photography shouldn't expose the film differently than the recommended
EI and color temperature EI. What it does mean, is that if you change the
parameters of exposure, the quality of the image will change too. The negative
is forgiving, but only to a point. Once you pass that point, it will be hard
to miss the changes-particularly in a scene. You may be lucky and the shift
will work for you. On the other hand, you may be out the door.
Okay,
now that I understand what 18% gray is, what do I do with it?
Now, after
the above section on color, and density, and metering correctly, here's how
to intentionally expose the gray differently than the scene to achieve a desired
result. Take a moment to look at my handout, Understanding Complimentary Colors.
If a colorist, either in film or electronic dailies, views and times a scene
to a correctly exposed gray card, then the scene should be close to what the
cinematographer wanted it to be. There's also the possibility to expose the
gray opposite to the way the scene is shot to shift the timing. There are
good reasons for this. If a cinematographer wants to cool or warm a scene
up without gelling all of the lights, then simply shooting the gray card in
complimentary light would give the timer an indication of what s/he was trying
to accomplish. I give the example of exposing the gray card with a 1/2 CTB
to shift the scene warmer by a value of 1/2 CTO. By examining the star diagram,
you can see each color's complimentary. The possibility also exists to film
the gray card 1 stop more dense. I've done this when I've shot day-for-night.
On a film I recently shot in Europe, I did a great deal of day-for-night cinematography.
I exposed the gray card +1 stop with my color filter package on the lens.
When I exposed the scene, I pulled the #85 filter and exposed for a full negative,
knowing the print would be timed 1 stop down. The results worked beautifully.
The negative could be printed further down if needed, or it could be printed
up without losing the effect. One last note, it always helps the timer and
the editor to indicate what you are doing on the slate. I recently had a bad
experience where my camera team didn't put "Day-for-Night" on the slate, and
the timer timed the scene as an exterior day. I couldn't blame him, he didn't
have the necessary information to complete my vision.
Okay,
I've got it. But how do I light the gray card?
In the
best of all worlds, the gray card would be lighted with classic graphic lighting.
The lights are on a 45° angle, perfectly balanced and the objective lens centered
on the card. Unfortunately, we don't get time to do perfect lighting on a
gray card. There are a few thoughts I can leave you with that might help you
get the results you want.
1.) Use
the Gray Card Plus or a gray card you know is calibrated. The Gray Card Plus
is more forgiving than any card I've known.
2.)
Place the light for the gray card as far from it as possible. I say this because
you probably will only have one light for the card. You can always use a 1/2
single, or double, to try to even out the light on the card, but the further
the light is from the card, the less fall off you'll have. (Think about the
Inverse Square Law and light.) It may not be perfect, but it will be better
than a lighting unit a few feet from the card.
3.) Color Correct the light on the card. You can do this for an effect, or
for a normal rendition of the scene. If you don't use a color temperature
meter, don't blame the lab if your film is "cooler" or "warmer" than what
you shot. Most tungsten lights are not 3200°K, in fact, many of them are closer
to 2800°K. If you don't measure the color temperature of the lights, blame
yourself since you don't know what color the lights was on the card, much
less the set.
4.) If you are filming a lighting effect in the scene, film the gray card
in "white" light, or neutral light, to preserve the effect. If the card is
lighted with the same colored, or effect light, the effect will probably be
timed out.
5.) In a mixed light situation you want timed out, e.g. fluorescent light,
put the card in that light to film it. The colorist should see the color shift
and time it out.
6.) Finally, have fun with it! Think of different ways you can make the tool
work for you, and simplify your job. I mean, if you're not having fun, what's
the point?
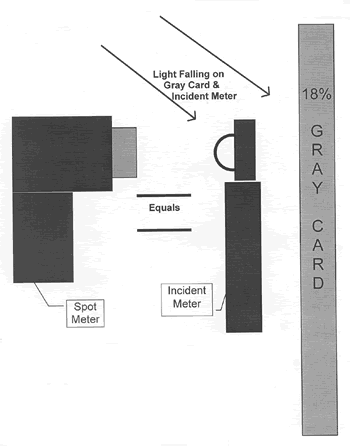
Spot
Meter/Incident Meter Relationship
The Spot
Meter should read the same T/Stop as the Incident Meter when the Incident
Meter is positioned in the same plane as the gray card. One must be careful
when lighting and metering the gray card. For example, if peripheral or sidelight
strikes the Incident Meter's ball, the reading will not be accurate. If the
gray card has a high light, or a reflection from a source, the spot meter
reading will not be correct. Another example, if the gray card is not 18%
gray (all gray cards are not equal!!), the two meters readings' will not match.
In addition to these circumstances, apparently there is another circumstance;
an older Spectra with a ball will read the same T/Stop as a Minolta Spot Meter
F as a Minolta Incident Meter with a flat disk. Everything has a bias, one
needs to be aware of them to help capture wonderful images.
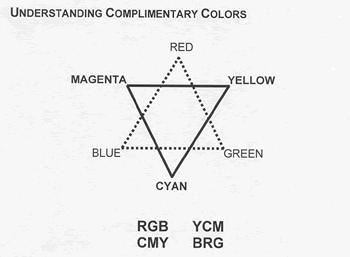
How
do you make sense of this? If you look at the overlapping triangles, you will
notice there is a method to the complimentary colors. The Red Green and Blue
on the one triangle are the complimentary colors to the Yellow Cyan and Magenta
on the other triangle. This diagram should help you understand the directions
you can shift scenes you shoot without gelling all of the lights. For example,
if you put a red gel over the light on the gray card (or over the lens) you
shift the scene cyan not blue. When the gray card is lighted with the complimentary
color, the scene will be timed opposite to the card. If you're dealing with
color temperature, lighting the gray card with a CTB will shift the timed
scene to "look" like a comparable CTO. For example, if a ˝ CTB is placed over
the 3200° K lamps lighting the gray card, the scene will shift to an overall
"look" of a ˝ CTO. Unless the lighting gels are calibrated very accurately,
the shift may not be exactly the same as if you were lighting with ˝ CTOs,
but it will be close. Only by testing will you gain mastery over color representation.
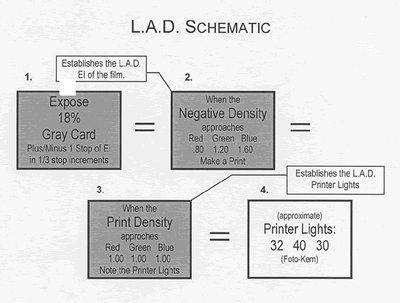
1. Expose the 18% gray card at the film's recommended EI with the correct
color temperature light, and 1 stop above and below that EI at B stop increments.
2. Read the density of the negative. The exposure that gives the L.A.D.
density establishes the L.A.D. EI of the film being tested. If the red or
blue emulsion is significantly off, the color temperature can be shifted
up or down until the red and blue emulsion densities are at, or close, to
the L.A.D. The Green emulsion may be slightly denser than the Red and Blue
emulsions.
3. Make a print from the L.A.D. negative. When the print is "a hundred"
across (not exactly the L.A.D., but within A printer point), note the printer
lights.
The printer lights that give an L.A.D. print from a L.A.D. negative are
the "normal" printer lights for the L.A.D. negative. Once the Printer Lights
are established, one can change the EI of the film for a particular "look,"
and still call the Printer Lights. On a 6 point system, a B stop increase
in density (e.g., EI 500 to EI 400) is a 2 point increase of the printer
lights, while a B decrease in density (e.g., EI 320 to EI 400) is a 2 point
decrease in the printer lights.
Note:
A film's specific L..A.D. is calibrated by reading the density of Dmin (processed,
but unexposed negative stock) and adding .70. The normally used L.A.D. of
.80 1.20 1.60 is from the film used on the "L.A.D. Girl" we see on the hazeltine.
Most Eastman negative film stocks are close to the .80 1.20 1.60 densities
I often mention.